On the Edge

How do you make sure your English paper pieced quilt has a nice edge that’s easy to trim and bind?

I used to get folded over bits of fabric and little holes but after a while I found an easy way to get a nice straight 1/4″ edge. I simply add a 1/4″ to the template and cut it out. I always cut the seam allowance at a 90ยบ angle.


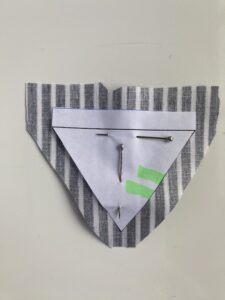
When I wrap the fabric around the papers I leave that edge unwrapped and trim the fabric flush with the paper.

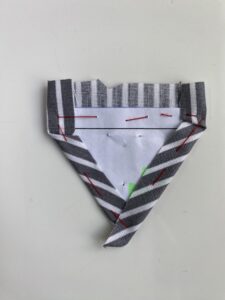
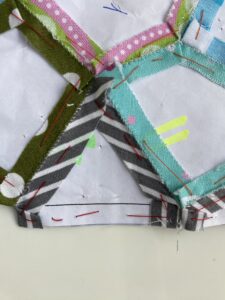
Then I sew the pieces together with my usual whipstitch and end up with a wonderfully flat edge that is easy to bind without losing any of my points.

I hope that helps.

Happy sewing!


Sewing over Pins

Last week I had the pleasure of teaching one of my friends’ daughters to sew. I started her off by making her follow some lines I had drawn on a piece of paper before giving her some fabric to practice on. Poppy soon put the pedal to the metal and sewed curves like a pro. Straight lines, however, weren’t quite her style. I got her to slow down and try follow some lines again but soon she was off again at breakneck speed. It was time to do some proper sewing.

We went to my stash and I let her choose fabrics for a pincushion. She quickly picked out some Summersville Spring Tread in pink and purple by Lu Summers and then added some Midwest Modern 2 Martini in tangerine by Amy Butler. I cut the fabrics into squares for Poppy as I wasn’t quite ready to let her loose with a rotary cutter. She then decided on the layout and sewed them together. Poppy slowed down considerably for the ‘real thing’ and her lines were really straight! Most importantly, she only sewed over one pin. We stuffed the pincushion quite full and I then sewed the opening shut with a ladder stitch as by then Poppy’s concentration had gone and I really wanted her to take home a finished pincushion. I was very proud of her achievement and think her pincushion is beautiful.

Poppy's pincushion