I love EPP and have over the years found lots of little tips and tricks that have helped me get more enjoyment out of sewing and I thought this is the perfect opportunity to pass some of them on.
RESIZING: It’s fairly simple to resize your templates if you feel that they are too big for your project. The tiles of my Block of the Month are 18.5″ from tip to tip because I wanted twelve large blocks for a large quilt. If I wanted them at 14.5″, for example, all I need to do is divide 100 by 18.5 and multiply the result by 14.5. This will give me the number, in this case 78,5, which I need to enter into my printer to scale the design down.
So if I wanted to scale the templates down to 12.5″ I would need to do the following: 100 : 18.5 x 12.5 = 67.5. For some reason my printer didn’t like the 67.5 and changed it to 68.
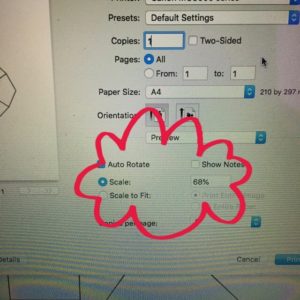
You could of course also scale the design up to 24.5″ by doing the same: 100 : 18.5 x 24.5 = 132.5. When you want to make your templates larger be aware that they may not fit on your A4 sheet anymore and you might have to glue them together.
PAPERS: I prefer to use paper that isn’t too thick; 80g/m3 is my go-to weight. Now, I like to thread baste my shapes going through the paper with the needle and therefore don’t like to have paper that is too thick.The thinner paper also makes it easier to fold shapes so as to slot them into the right place.
However, if I were glue basting I would use a heavier paper 100g/m3 or even 120g/m3 to be able to get the fabric off the paper more easily. For easy paper removal you can also punch a hole in the middle of your template.
TEMPLATES: As I often have various shapes in my designs where it’s not clear which way they need to be sewn, I like to mark my templates. You can do this before you cut the templates apart and it makes it easy to then sew the pieces together. Just make sure your marks are a little longer than your seam allowance.

THREAD: To baste I just use any old thread I have lying around, usually some colour I can’t see myself ever using again. To sew my shapes together I always use Aurifil 50wt. I find that it melts into the fabric and can hardly be seen once you’re finished.
Aurifil now also has a 80wt thread which I love for appliqué but find too thin for EPP. I’m quite a brutal thread tugger and have found that I get a lot of thread breaks when I’m using the finer thread. Having said that, I have friends who swear by Aurifil 80wt for EPP so I think the most important is to find the thread you are most comfortable with.
I like to use thread in different colours as this also helps the stitches to disappear. If you haven’t got the right shade of thread but have one that is lighter and one that is darker, always go with the darker one as that one will blend in better. If you haven’t got a specific colour, use grey thread as that will blend in with most colours.
If you’re using multiple colours to sew together two or three shapes, thread as many needles as you have colours. It’ll save thread and make your life a lot easier as you can simply switch needles rather than having to re-thread all the time.
NEEDLES: I use the Clover black and gold needles, a size 9 for thread basting and a size 11 or 12 for sewing the shapes together. They are very sharp and as I have problems with my thumbs due to hypermobility I need all the help I can get to make sewing as gentle as possible on my hands.
I’ve also heard that some quilters love Tulip needles but I haven’t tried them and can therefore not comment on them. Like with the thread I think the most important thing is to find a needle you’re happy and comfortable with.
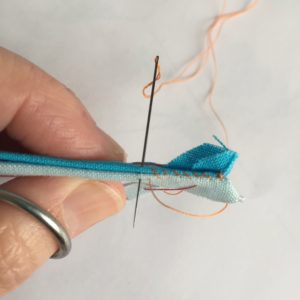
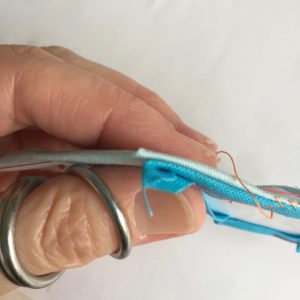
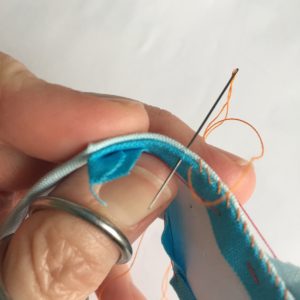
THREAD BASTING: To make it easier for me to take the threads out once I’m finished I like to have the knot on the right side and finish off the basting with a backstitch that leaves the tail on the right side. When basting the same shapes I also try to start in the same place every time.

Once you start pulling out your threads it’s easy to find the knot, pull out the backstitch and continue pulling on the threads or when it’s a fairly small shape just pull on the knot to get rid of the thread. I use a pointy implement to pull out the basting stitches, either a crochet hook, knitting needle. a Purple Thang or one of my whittled sticks.

STITCHES: I like to use a whip stitch to sew together my shapes. I don’t mind if stitches can be seen on the front.
However, if you prefer not to see any stitches you can use a ladder stitch or lay your shapes next to each other on a flat surface and whip stitch them together like that.
I always start sewing by doing two back stitches in the seam allowance, then a quilter’s knot and finish sewing by making another quilter’s knot and two back stitches in the seam allowance. I also make a quilter’s knot every time I go around the corner. This may be complete overkill but I have never had a piece come undone and my cushions are used daily and washed a lot.
SEWING: I usually start sewing from the point to make sure my points stay pointy. I also like to sort smaller shapes into bigger ones that are easy to sew together.
If you find yourself with two shapes that don’t fit together perfectly, i.e. one edge is slightly longer than the other, make sure the shorter one faces you, then gently curve both edges around your thumb as you sew. As the longer edge has to fit around your thumb and the shorter one, they should start fitting together nicely.
FUSSY CUTTING: I usually use template plastic to fussy cut. I copy the shapes onto it, then add the quarter inch seam allowance. I then place it on the fabric and draw on the template with a pencil if I want to re-use the template or with a marker if I don’t.

If I can’t find my template plastic I use some card or a cereal box. I copy the shape onto the card, add the seam allowance then cut out the shape so I only have the seam allowance left. I then draw on the seam allowance.

These are the materials I like to use and a few tricks I’ve picked up along the way. If you have any questions or can think of more tips and tricks (I’m sure there are lots more), please let me know in the comments or by sending me an email. Thank you very much!
2 thoughts on “Tips and Tricks”