Bright Pink and Orange

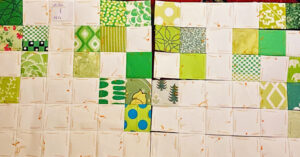
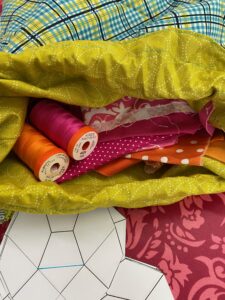
I love bright colours and picked bright orange and pink when I started my latest project. It was slow going. More because I didn’t take the time to work on it, than because it was complicated or that I wasn’t sure about it. I loved it from the start and never got to that ‘meh-stage’ that I usually get somewhere in the middle of a project. All in all it took me more than a year.

This project bag has been a blessing as my project was always ready to take to work, so I could sew whenever I had a minute or two.

This piece doesn’t have a name yet, which is highly unusual for me. I usual call my patterns or projects something, even if it is really banal such as ‘The Purple Quilt’ or ‘The Green Cushion’.

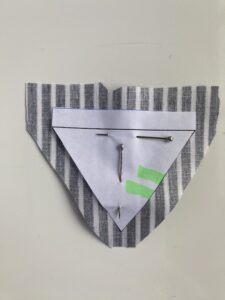
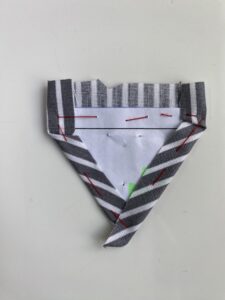
On the day I was appliquéing the finished EPP piece onto the background, I was actually wearing an orange t-shirt, pink trousers and my mustard shoes. It did make me laugh and I was wondering if I should turn this into a trend and only work on my various EPP projects when I’m dressed appropriately.

Almost Done

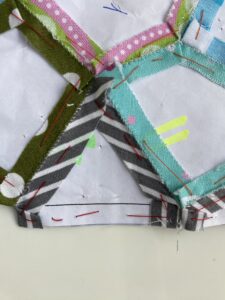
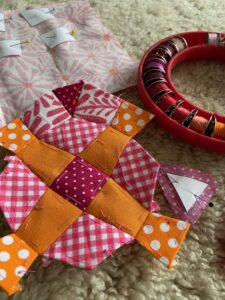
I enjoyed seeing this piece grow. I never plan my pieces in advance but just work in ‘rows’ or small sections, auditioning fabrics. It sometimes happens that I unpick and change fabrics but very seldom and I usually realise it before I’ve sewn on all the pieces.

Olive had to help, of course. This cat is driving me bananas! She’s the cutest, most loveable kitten one could wish for but she does destroy a lot. Together with her ‘brother’ she’s destroyed most of my plants and pots, she chews on all the pencils (I hide them), she finds and kills my woollen socks, hats and scarves (it’s a good thing I have an endless supply as my sister is a very talented and prolific knitter) and sits on every plate or bowl I get out to put food on. I do, however, forgive everything as her face lights up and she runs towards me with the cutest little meow whenever she sees me. She sleeps in my bed and every morning I’m greeted with enthusiasm.

I’ve attached the piece to the background and am now going to turn it into a tote bag. I always end up making cushion covers, but how many cushions do I really need?

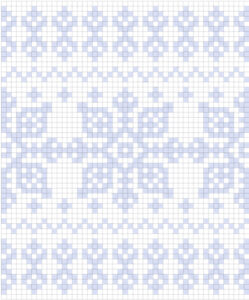
The pattern for this piece is part of a very exciting project and will be available at a later stage.

A Start

I’ve started on the Grenoble Quilt. I have to admit that I was naughty and started on it before having finished three WIPs. I simply couldn’t wait. However, I did go back to my pile of unfinished projects once I’d scratched that itch and finished three small projects.

I’ve cut up my template into small chunks of 6 x 7 squares which means I end up with blocks that are 7.75″ x 9″, a nice manageable size to work on while I’m out and about.

Once I finished the first block I sewed the little template onto it so I remember where the block goes.

So far I’ve only finished two blocks but I’ve decided that once I’ve sewed the first seven (which means one whole row). I will then sew them together before continuing with the next seven blocks. This method should make it easy for me to see my progress. I can get bored by projects if I don’t see enough progress.

When I started the block I thought I would go scrappy with the background too, but I haven’t really got enough different low volume scraps so in the end I decided to only use solid whites. As they are scraps they’re not all the same white but I don’t mind that at all; I think it gives it a bit of movement. So far I’m only using greens but I’m thinking of doing the zigzag in dark blue and the crosses in teal or even pink. I’ve got a bit of time before I have to decide what to do (twelve more blocks to be exact) and I rather like not planning ahead. Especially as this quilt will be completely made from my stash.

One thing I have to admit though is that basting and sewing squares is booooooring. Thank goodness for Netflix or this would not end up as a quilt but as a cushion or table runner.

Happy sewing!

Grenoble, a Norwegian Quilt

It’s amazing what can inspire you. I was once inspired by some quilted toilet paper. This time inspiration was a knitted jumper. There’s a fabulous magazine in Norway called Hjemmet, which my mother has subscribed to for as long as I can remember. As I was reading one of their knitting supplements on classic Norwegian jumpers  designed by Dale Garn for the Olympic Games throughout the years I fell in love with the jumper designed for Grenoble in 1968.

Design by Dale Garn, Norway

I’m not a knitter, in fact all my Norwegian jumpers and cardigans have either been knitted by my grandmother or my mother, but I am a quilter. So I turned the Grenoble jumper into a Grenoble quilt. I changed very little in the snowflake as I think its beautiful the way it is but replaced the stripes with a zigzag as I loved the zigzag at the bottom but knew I didn’t have space for it in this quilt.

It’s going to be a long term project. I’ve decided to go for 1.25″ squares as this means this quilt will end up being 61.25″ x 73.75″. I think that’s a good size for a single bed. I might make it bigger but I think it’s good to start with a manageable size.

I’ve calculated that I need 2891 squares for this quilt, 1753 for the background and 1138 squares for the pattern. I haven’t calculated how much fabric I need exactly but I think it’ll be about 1.50m for the background and about 1m for the coloured fabric. I’m still pondering a few things before jumping in and starting this new project:

  • should I have one fabric for the background or go scrappy?
  • what colours to use. In the picture I used light blue but I’m wondering if I should go for greens as I’ve just made two blue and white quilts. Or maybe use reds, pinks and oranges for a modern look? I’m definitely going scrappy for the coloured squares.
  • I have a rule for this year: to finish three projects before I start a new one as I have a million WIP’s cluttering up my sewing room. I’m trying to find the ones that take the least effort and are finished the quickest…

If you would like to make this quilt, you can download the graph and use as a guide.

Norwegian Quilt

Happy sewing,

Elisabeth


Shields

My poor little blog has once again been terribly neglected but today I have a new EPP pattern for you. Shields is a really easy pattern made up of only two blocks but there are many possibilities.

I had a little bit of fun colouring it in TouchDraw, the app I use to design all my Epp patterns, and ended up with two very different looking possibilities.

I posted it on Instagram and as there was a bit of interest I thought I’d provide the templates for this pattern here on the blog.

Here they are:

The templates for squaring up can be cut either horizontally, vertically or into quarters on the dotted lines. The colouring sheet is so that you can do a little bit of planning. I often start colouring in and end up with something completely different but I think with this pattern I would probably go with solids and plan the blocks carefully.

Now these blocks are 6″ x 8″ and if you think that’s a bit big you can always print them out smaller. If you’re not sure how to do that you can check out one of my previous posts on ‘Tips and Tricks’.

If you should sew up this pattern and are on Instagram I’d be really happy if you tagged me, lemonshark, and/or used the hashtag sharksdinnerpattern. Thank you and have fun sewing!

Lockdown patterns

It’s now been seven weeks since lockdown started here in Switzerland. You would think that it’s the perfect time to sew but I’ve not really felt it. I have been sewing a little but with all the time spent on homeschooling my daughter I’ve done less than expected.

The fabric shop I’m working at, Alja nouveau, is expected to open again in two weeks time and my colleagues and I are going to sew a few masks. I’m sure lots of people are going to come to buy fabric and elastic but some might also want to buy finished masks. I’ve already sewn a few but I thought that among all that catastrophe sewing it would be nice to do something else so I’ve designed a couple of free English Paper Piecing (EPP) patterns for you.

The first one is called Comfort and I’ve designed it to become a cushion. I’m not sure why the bottom line isn’t in the picture, it’s there when I look at the picture in my photos. Anyway, the size is 16″ x 18″ as I like a slightly rectangular cushion and if you stuff a 20″ x 20″ cushion filler in it the cushion becomes nice and plump, just the way I like it. If you’d like it a different size you can, of course, resize it before printing it out. If you’re not sure how to do that, check out one of my previous blog posts Tips and Tricks.

Find the templates for Comfort here:

I’ve written on the templates how many times you have to print them out to make the cushion.

Next there’s a pattern for a table runner (although I could also imagine three or more appliquéd onto a background to make a stunning quilt). Gratitude finishes at 13.5″ x 46″.

Download the templates for Gratitude here.

You will need to print out each file twice to have all the templates. When sewing it’s easiest to start with a (the outside) and work your way through the alphabet or if you prefer to work from the inside out, start with g and work your way out to a.

I’m happy to help if you have any problems or questions with either of these patterns. Email me at sharksdinner (at) sunrise (dot) ch and I’ll do my best to help.

I really hope you like these two new patterns. If you do sew one of them and you are on Instagram, I would love it if you added me (@lemonshark) and/or used the hashtag #sharksdinnerpattern. Thank you!

Happy sewing!

BOM 2019: NOVEMBER

Last one! That’s right, it’s the last tile for this block of the month. Then it’s time to appliqué the tiles onto a background, quilt and bind. And all this before the end of the year.

I’ve started with the appliqué but have only managed one tile so far. This month has whizzed past at an extraordinary pace and I have to admit that I haven’t finished my October tile. Shame on me, I know. I’ve just had lots of other things to think about and the BOM has sort of faded into the background. The main reason for my inability to sit down and concentrate on my sewing have been the raging hormones in my pre-teen daughter. I’ve simply been too exhausted to sew after all the ups and downs every day has brought.

As a blog post without at least one picture is rather boring I thought I’d post one of my little ‘helper’ Blue looking adorable.

Right, here’s the last tile:

I’m really curious about this one. I’ve had to think quite a bit about where to put my coloured accents but I think I’ve got the perfect placement now. The placement of the coloured fabric is actually the only thing I plan in advance, all the other fabrics are chosen as I sew and I never really know what the tile is going to look like until it’s finished.

Here are the templates:

And here’s the whole tile so you can plan your fabric placement:

I’m going to have to knuckle down, finish my October tile and get on with this one as soon as possible. I have to take things a little easy at the moment as I’ve been diagnosed with shingles. I see quite a bit of hand sewing and tv watching in my future.

Happy sewing!

BOM 2019: October

How can it be October already? I feel like this year has flown past. It’s alright, though, as I love autumn and October is my favourite month. The light is amazing and I love seeing all the autumn colours on the trees. It’s my birthday month and this year it’s one of the big ones: 50.

I love the age that I am, I love that I know who I am and what I want. I love the person I’ve become and I wouldn’t want to change anything in my life as everything that’s happened, good and bad, has shaped me. So I’m happy to say bring on the fifties!

Anyway, enough with the rambling. Here’s my September block which I finished at the last minute and where I added some fun orange accents.

I’m getting more and more excited about this quilt. I’ve started appliquéing the tiles onto the background but haven’t gotten very far yet. I really need to get a move on, though, as there are only two more tiles to sew.

Curious about the penultimate tile? Here it is:

I’m a little bit at a loss on how I’m going to do this one and where I’m going to put the coloured accents. Once I start all of this usually falls into place quite quickly so I’m hopeful that I’ll come up with a plan soon enough.

Right, here are the templates:

And here’s the entire tile so you can plan your fabrics if you are so inclined:

I’m really looking forward to seeing all the various versions on Instagram.

Happy stitching!

Passing it on

I caught the English Paper Piecing (EPP) bug about seven years ago when I started my first hexie cushion. I still have it and when I look at it I see all the imperfections. However, I love it so much that It sits on my favourite yellow chair in the living room, reminding me of my humble beginnings…

Well, I’ve gone and infected my mum. She was curious to try out EPP, so I gave her some big hexagons and some fabric and showed her how to baste and sew them together. She made a gorgeous runner to brighten up her dark blue chair.

After she finished it, she wanted to make a cushion cover and picked diamond shapes and some turquoise, white and pink fabrics.

As soon as she’d finished she asked me for something red. I had just designed a cushion cover for my sister to try out EPP as she’d seen my mother’s beautiful creations. As there were two versions I gave one of them to my mum with various red fabrics.

Those pieces are quite big so she finished it in no time, turned round to me and said the magic words: “I think I’m ready to start a quilt now.” You could’ve blown me over with a feather. I grabbed my iPad to open TouchDraw and started designing before she could change her mind. I gave her the papers and some Gütermann fabrics I had bought to make a quilt for my daughter two or three years ago and she set off.

Isn’t it beautiful? I’m sorry the picture is rather bad quality but I think you can still appreciate the beauty of it. My mum first said she was going to make four rosettes, then decided that maybe six were in order. I still think she’ll continue and make nine, although she is sure she won’t. We’ll see who’s right, won’t we?

As for my sister (who’s a prolific knitter), we’re going on holiday together soon and we’re both taking our EPP kit with us. I’ll show her how to EPP and maybe just maybe she will catch the bug, too.

BOM 2019: September

How are we in September already? I feel like this year has flown by and I’m sure it’s also because of this Block of the Month, as I have been looking forward to the new tile every time I’ve finished the current one.

Here’s my August tile:

I really like this green with the black, white and grey. And I also like how all my tiles look together on the background fabric:

As you can see Charlie was very happy to help with the layout.

You may also have noticed that my tiles don’t fit on my background fabric. This has meant that I have indeed gone back to my original plan and I’m going to appliqué them onto squares of fabric and hand quilt them before sewing the squares together. This will be my first ever quilt-as-you-go quilt and I’m really excited to try it.

Right. Are you curious about this month’s tile? Here it is:

Here are the templates:

And the whole tile so you can plan your fabrics:

I’m looking forward to seeing all your beautiful blocks this month. Mine is going to be orange (at least if I find a nice orange in my stash).

Happy sewing!

Portable?

I love EPP because it’s portable. I can sew at home on my sofa while watching tv or I can take it with me on holiday. I can sew on the train, in the garden and many other places.

However, I’ve now started a project that is EPP but most definitely isn’t portable. My Floral Star quilt started with a stack of fat quarters I was gifted by my lovely friend Paula. She knows how much I love anything designed by Kate Spain and I was thrilled to bits when she gave me her stack of Canyon fabrics. I knew I had to make something special with it and decided to try and supersize one of my designs. The choice fell on Floral Star and I couldn’t be happier so far.

The colours aren’t the same in my version so it looks quite different.

As you can see I’m not finished yet. I had to let Charlie sit on it as no one really understood just how big it is already. I don’t mind, though, as he is the cutest cat in the whole wide world. The smallest piece is about 3.5″ x 4.5″, most of them are over 7″. It’s quite a challenge but fun too. I had to use slightly thicker paper as normal 80g/m copy paper bent too easily with such large pieces. It makes the whole thing harder and heavier to handle so I can only work on it when I’m sitting on the floor or at a table.

Since taking this picture I have finished sewing on the magenta triangles and am now going to continue with some green, I think.

If you’re on Instagram you can check out my progress with the hashtag ⌗sharksdinnerfloralstar